Image Data Pipelines in Python
Published:
In this blogpost I will present a possible pipeline approach that can be used to model with image data, using ImageDataGenerator objects from the Keras image preprocessing library (TensorFlow backend) in Python. Jay Acharya, Neil Molkenthin and I collaborated on this and presented it in a Digital Futures Deep Learning workshop.
Working with Images
Throughout this explanation I will assume that you, the readers, are familiar with path manipulation and management with libraries like os, glob, pathlib, amongst others. This will be very helpful in understanding how the methods I will detail are accessing images from directories where they are stored, to then translate them to Python objects that Matplotlib can plot as images.
Speedy Computer Vision Recap
A big part of starting to work with images in deep learning is understanding computer vision. As a brief summary, various libraries exist to read images into Python as NumPy arrays (cv2 by opencv, pillow, PIL). The dimensions of these arrays depend on the colouring of the images. If the images are in full colour there will be 3 colour channels (RGB - red, green, blue), on the other hand, if the image is grayscale there will only be one colour channel (which is not to be confused with binary colouring, which is only black or white). Colour channels usually have values that range between 0-255.
In this blogpost we will work with a Kaggle image dataset on two varieties of pistachios [1]. If we have an image with three colour channels, its array could have the following dimensions:
import cv2

img_path = 'pistachio/Pistachio_Image_Dataset/Pistachio_Image_Dataset/Kirmizi_Pistachio/kirmizi (1).jpg'
img = cv2.imread(img_path) # reads in an image from its specified path
print('Object type: ', type(img),
      '\nObject dimensions: ', img.shape)
Object type:  <class 'numpy.ndarray'>
Objct dimensions:  (600, 600, 3)
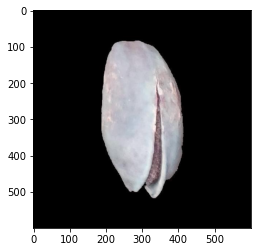
This length three tuple describes the dimensions of the image (600x600 pixels) and the number of colour channels represented (3). In this sense, if we printed out the array, we can understand how each value for each colour channel represents a pixel in the original image.
Okay but, we’re not computers and we can’t look at a bunch of numbers and visualise an image in our brains. This is where matplotlib comes in!
import matplotlib.pyplot as plt
plt.imshow(img)

Cool, now we have an idea of what Python understands an ‘image’ to be.
Current Directory Structure
If we download the complete pistachio dataset [1] from Kaggle, we can see that the directory structure is as follows:
def print_tree(path):
  '''
  Given a path, print the directory structure and include the first 5 files in each directory
  '''
    for root, folders, files in os.walk(path):
        directory_level = root.count(os.sep)  # os.sep returns the sepperator on your current opperating system (/ for linux or mac, \ for windows)
        indent = "    " * directory_level
        print(f"{indent}{os.path.basename(root)}{os.sep}")  # the os.path.basename selects the folder at the end of the "root" path to show
        for file in files[:5]:
            print(f"{indent}    {file}")
    return

data_dir = 'Pistachio_Image_Dataset'
print_tree(data_dir)
Pistachio_Image_Dataset\
    Pistachio_Image_Dataset_Request.txt
    Pistachio_16_Features_Dataset\
        Pistachio_16_Features_Dataset.arff
        Pistachio_16_Features_Dataset.xls
        Pistachio_16_Features_Dataset.xlsx
        Pistachio_16_Features_Dataset_Citation_Request.txt
    Pistachio_28_Features_Dataset\
        Pistachio_28_Features_Dataset.arff
        Pistachio_28_Features_Dataset.xls
        Pistachio_28_Features_Dataset.xlsx
        Pistachio_28_Features_Dataset_Citation_Request.txt
    Pistachio_Image_Dataset\
        Pistachio_Image_Dataset_Request.txt
        Kirmizi_Pistachio\
            kirmizi (1).jpg
            kirmizi (10).jpg
            kirmizi (11).jpg
            kirmizi (12).jpg
            kirmizi (13).jpg
        Siirt_Pistachio\
            siirt (1).jpg
            siirt (10).jpg
            siirt (11).jpg
            siirt (12).jpg
            siirt (13).jpg
Because we’re only interested in images today, and not pistachio features (length, width, colour, etc.), the subdirectory we want to keep an eye on is: 'Pistachio_Image_Dataset/Pistachio_Image_Dataset'.
The next question to ask ourselves on the road to using this data for modelling would be: how we will store this data in objects so it is usable?
With text or numeric data, we can store it in Pandas DataFrame objects and access and manipulate it from there quite easily. This data isn’t usually too heavy and doesnt take a lot of computational power to process. Images are a whole different story. Because there’s so much information to get from an image, storing them as arrays (especially if they are large in size) can be very heavy. Moreover, processing and feeding images into models can be intensive on Random Access Memory resources. So, what now?!
If you’re just starting out on working with images, loading a sample dataset that has smaller images and saving the image arrays in a list isn’t a terrible idea, but it’s not as efficient as other methods. These other methods rely on the TensorFlow library or libraries that have a TensorFlow backend (like Keras). Most of them rely on generators.
Generator functions
Generators yield information iteratively rather than return the final result of an iterative expression at the end of a function. They are objects than can be used in a for loop and are characterised for containing the Python keyword yield. Let’s look at a simple example [2] of two functions that will build a list of a specified length:
# Function that returns a list of length n
def make_list(n):
    '''Build and return a list'''
    num, nums = 0, []
    while num < n:
        nums.append(num)
        num += 1
    return nums

# Generator function that yields a list of length n
def gen_list(n):
  '''Build a list generator'''
    num = 0
    while num < n:
        yield num
        num += 1

a = make_list(1000)
b = [i for i in gen_list(1000)]

print(a == b)
True
Both methods build lists that look like this: [0, 1, 2, ..., 998, 999], however the generator function needs to be iterated over to achieve this result. Explicit invocation of the generator function will only show us the type of object it is. Looping over the generator will allow us to avoid storing this list in memory; instead it can generate information with every iterative invocation that can be used in real time by other functions. This is more efficient if we consider a list that is 10 times the size of the one in the example. We can now begin to understand why a generator approach could also be more efficient in the case of image arrays, which are also considerably heavy.
Image Data Generators
We’re here, it’s time! How do we build an image data generator? As I previously said, there are various methods, which sometimes depend on the format of your data. The basic idea of them is: read the path to an image, process it as a NumPy array and yield the processed image. There are two ways I’ve seen so far to achieve this pipeline:
Although it is known that the first option is more efficient than the second [5] [6], I will show an example with the second because it’s more intuitive for a beginner working with image data.
To use the Keras ImageDataGenerator it will be more useful for our directories to have a train and test structure. To achieve this, we can use the splitfolders library:
import splitfolders

# Specify the path of the current images dataset
input_folder = "Pistachio_Image_Dataset/Pistachio_Image_Dataset"

# Specify a new path where you want the split dataset to live
output_folder = "Split_Pistachio_Dataset" # This directory will be created if it does not exist

# Split the folders. Ratio argument follows train/validation/test split.
# For train and test only, we use a length 2 tuple (even though the test directory will be called val)
splitfolders.ratio(input = input_folder, output = output_folder, seed = 42, ratio = (0.7, 0.3))
Let’s see what the directory structure of the copied files looks like:
print_tree(output_folder)
Split_Pistachio_Dataset\
    train\
        Kirmizi_Pistachio\
            kirmizi (1).jpg
            kirmizi (12).jpg
            kirmizi (13).jpg
            kirmizi (14).jpg
            kirmizi (16).jpg
        Siirt_Pistachio\
            siirt (10).jpg
            siirt (11).jpg
            siirt (13).jpg
            siirt (14).jpg
            siirt (17).jpg
    val\
        Kirmizi_Pistachio\
            kirmizi (10).jpg
            kirmizi (11).jpg
            kirmizi (15).jpg
            kirmizi (17).jpg
            kirmizi (18).jpg
        Siirt_Pistachio\
            siirt (1).jpg
            siirt (12).jpg
            siirt (15).jpg
            siirt (16).jpg
            siirt (2).jpg
Great, now that we have a train and test split in our image data, we can have different generators for both these types of data. Here is a function that creates these generators alongside a validation data generator, which is useful in deep learning [8]:
from tensorflow.keras.preprocessing.image import ImageDataGenerator

def image_generator(train_parent_directory, test_parent_directory):
    """
    Given training and testing directories which contain subdirectories with images for each class,
    return training, validation and testing image data generators.

    These generators will:  - split training data to create a validation dataset with a (0.8, 0.2) ratio
                            - resize images to a common size of 356x356
                            - rescale image arrays between 0-1 (from 0-255, in full colour)
                            - yield images in batches (5 for train and validation, 1 for test)
                            - use sparse data labelling for train and validation generators
    """

    # Instanciate generators and image pre-processing steps
    train_datagen = ImageDataGenerator(rescale=1./255, validation_split = 0.2)
    test_datagen = ImageDataGenerator(rescale=1./255)

    # Specify parameters of data input to a model for train, validation and test
    train_generator = train_datagen.flow_from_directory(train_parent_directory,
                                                        target_size = (356, 356),
                                                        seed = 42,
                                                        batch_size = 5,
                                                        class_mode = 'sparse',
                                                        subset='training')

    val_generator = train_datagen.flow_from_directory(train_parent_directory,
                                                      target_size = (356, 356),
                                                      seed = 42,
                                                      batch_size = 5,
                                                      class_mode = 'sparse',
                                                      subset='validation')


    test_generator = test_datagen.flow_from_directory(test_parent_directory,
                                                      target_size = (356, 356),
                                                      batch_size = 1,
                                                      class_mode = None,
                                                      shuffle = False)

    return train_generator, val_generator, test_generator
When we run this function we will have three 'keras.preprocessing.image.DirectoryIterator' objects, which is what the ImageDataGenerator returns:
# Specify the path of training and testing directories
train_dir = 'Split_Pistachio_Dataset/train'
test_dir = 'Split_Pistachio_Dataset/val'

# Use paths as input to the image data generator function
train_gen, val_gen, test_gen = image_generator(train_dir, test_dir)
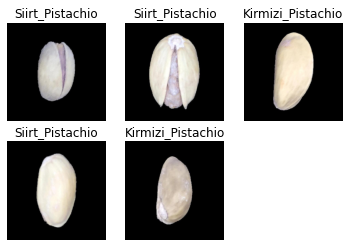
But how do these generators work? And how do we access data from them before passing them on to a modelling function that will iterate through them? Let’s try and figure this out by plotting the images in yield/batch of data. The most important method we will use is .next() which will give us the subsequent batch of images from the ImageDataGenerator. It returns two objects: the first is an array of image arrays, the second is the classes of each image array in the first object.
def show_generator_images(img_generator):
    """
    Given an image data generator, plot and label the next batch of images
    """

    # Get next image arrays and labels
    arrays, labs = img_generator.next()

    # The generator stores the classes of each image in an attribute called class_indeces
    # We can access these to our convenience:
    lab_dic = {v: k for k, v in img_generator.class_indices.items()}

    # If we iterate through each image array we can use the class_indeces dictionary we
    # created to label each plot of an image
    plt.figure()
    for img in range(len(arrays)):
        plt.subplot(2, 3, img+1)
        plt.title(lab_dic[labs[img]])
        plt.imshow(arrays[img])
        plt.axis('off')
    plt.show()

    return
show_generator_images(train_gen)
 .
.
Hopefully this has helped you understand the necessity of data pipilines when modelling or working with images, and also one such approach on how to achieve it. This method is slight slower than if we used a tf.data.Dataset approach, especially if we included image augmentation in the pipeline. Nevertheless, it is a good way to get to grips with image data and using it for deep learning. For an example project with ImageDataGenerator used for modelling with Neural Networks, check out my github repository for my Whale and Dolphin Image Classification project [9].
